
TABLE OF CONTENTS
Requirements
Installation Process
Properly Unmounting Your Gentoo Hardened Installation and Rebooting into UEFI Boot Mode
Completing Your Gentoo Hardened Installation
Thank God Almighty and The Good Lord Buddha, I AM FREE, AT LAST!!!
Post Installation Work and Package Recommendations

Requirements
1. A modern computer which is capable of booting in UEFI (aka EFI) mode. Almost ALL computers manufactured since 2011 have the ability to boot in UEFI mode. Most modern computers can also boot in BIOS mode, which is typically called something like Legacy OpRom mode in your BIOS Boot Page settings. Confirm that you have both UEFI and Legacy boot modes available on your computer, and learn how to switch between these two completely different boot modes.
UEFI booting is REQUIRED for the correct usage of both rEFInd and the SystemRescueCD. Legacy BIOS booting is REQUIRED, at least on my Asus rig, to be able to boot from the Gentoo amd64 install.iso burned onto a USB stick.
2. A Hard Disk Drive (HDD) you are willing to dedicate to Gentoo Hardened. First, copy any existing data you consider valuable on your intended Gentoo Hardened target HDD to another device. Then do not worry about any existing data remaining on your target HDD, as we are going to securely overwrite all of it in just a few minutes.
3. A working connection to the Net, which is required throughout the entire installation process.
4. The most recently released copy of: install-amd64-minimal-<release-date>.iso which you downloaded from any www.Gentoo.org Mirror. Note that these Gentoo amd64 minimal install *.isos get released about every week, so just grab the *.iso with the most recent date.
4a. If you are paranoid, like me, you will also download the related *.CONTENTS, *.DIGESTS, and *.DIGESTS.asc files.
4b. Then run:
sha512sum -c install-amd64-minimal-Release-Date.iso.DIGESTS
and you should see that 2 of the 4 files are OK, including the sha512 verification of your install-amd64-minimal-Release-Date.iso. Super, we’re now an important step closer to begin rocking our Gentoo Hardened installation, but there are a few other items we require!
5. A USB stick (256 Mb, or larger) onto which we burn the Gentoo installation-*.iso. I use UNetbootin, which is available from: http://unetbootin.sourceforge.net/
However, feel free to use any *.iso burning tool you like. Burn the install-amd64-minimal-Release-Date.iso onto your USB stick now!!
6. A second USB stick (512 Mb, or larger) onto which you will burn the SystemRescueCD iso. Do NOT use UNetbootin to install SystemRescueCD, instead follow the exact instructions at: http://www.sysresccd.org/Sysresccd-manual-en_How_to_install_SystemRescueCd_on_an_USB-stick
Burn the SystemRescueCD iso onto your USB stick now!!
I highly recommend this software and the SystemRescueCD project. Their System Guides covering Partitioning, LVM2 and Networking are outstanding, and definitely worth a read to deepen your knowledge!!
7. A BIOS which allows you to, and is capable of booting from your USB stick, and from any HDD drive, including an external USB HDD, where you wish to install Gentoo Hardened.
8. A printed copy of this guide, or some way to access this information during your install. Keep in mind you will NOT be able to access i2p, nor my i2p eepsite, which IS FAR MORE DETAILED than this ‘condensed’ guide during installation!! Therefore, I recommend you either print this guide out, prior to installation, or keep this guide running on a separate computer.
9. OPTIONAL: A printed copy of the Gentoo amd64 Handbook. However, rest assured that the complete amd64 Handbook will be available to you, using links, from within the Gentoo installation *.iso.
10. NON-OPTIONAL: An ability to read, follow, and execute instructions carefully, both mine, those in the amd64 Handbook, and all of Rod Smith’s EFI pages related to rEFInd. You should also possess a keen interest in learning (potentially) many new things about how your new Operating System carries out its compute operations.
Although this guide focuses on installing Gentoo Hardened as your sole Operating System on a dedicated drive, keep in mind that another huge advantage of using rEFInd as our boot manager, is that rEFInd can boot multiple Operating Systems, natively, out of the box! As you shall see, rEFInd is truly phenomenal, flexible and powerful code!
rEFInd, documentation, and code, if you want a sneak peek, is available at: http://www.rodsbooks.com.
Installation Process
We will be creating a disk with the following structure (using a 320 Gb HDD as an example.) The size of your HDD is irrelevant. What is important to understand, is that we will use a trivial 500 MiB (Mebibytes) for /dev/sda1, which will contain our rEFInd code, our configured hardened kernel and our generated initramfs. This size will also provide us plenty of headroom to hold hardened kernels released in the future, and perhaps multiple, copies of our previously configured kernels, which we might might to use for testing, or to provide ourselves with the ability to be able revert to a known, safe, working kernel! Our /dev/sda1 will also hold copies of our generated initramfs associated with each kernel configuration, well as the UEFI boot code for many other Operating Systems if that is part of your ultimate plan!!
If you are really stretched for HDD space, AND you plan on booting Gentoo Hardened only, you could probably get away a /dev/sda1 ESP sized as small as 32 MiB. The size of your /dev/sda1 is completely up to you. However, realize that my recommended 500 MiB size will give you a future proofed Gentoo Hardened installation, with the ability to launch many other Operating Systems, natively, which is EXACTLY what I want for my rig!
The entire remainder of your HDD (/dev/sda2) will be locked down with LUKS. Your encrypted partition will be INACCESSABLE by anyone on this earth, except you! This is true even if you install Gentoo Hardened on a multi-Petabyte drive! <== MY Buddha Bless/BTC Dream!! More on that topic, later, however, we’ve got work to do, now!
Understanding the Encrypted Gentoo Hardened Boot Sequence
Will we leave the first 500 MiB of our target drive unencrypted, for the sole required necessity of rEFInd being able to read our boot configuration files. Once rEFInd locates your hardened kernel and its associated initramfs, each stored on /dev/sda1, and loads both files and our specified kernel command line boot options, rEFInd then passes control to LUKS though our generated initramfs, and once your correct LUKS passphrase has been entered, LUKS will unlock, and decrypt, our encrypted partition, then LUKS passes control to lvm, and then lvm and dmcrypt will activate/’swapon’ your /dev/mapper/vg-swap and mount your /dev/mapper/vg-root at /root, and then, finally, your hardened kernel will assume control, and fire up Gentoo Hardened with all of your chosen kernel options and modules enabled!!!
After your partitions have been set up correctly, your new drive will have this structure:

As the Gentoo Linux AMD64 Handbook is such a finely crafted document, which I have almost completely memorized, I will only be discussing the parts of the installation process where we need to deviate from the amd64 Handbook. With these exceptions in mind, you need to follow, and execute ALL of the code contained in the amd64 Handbook, explicitly, where instructed below.
I can tell you that sober, focused attention is REQUIRED throughout this installation process! 😉
Hold on to your hats, because now it is time to get seriously busy!
1. Boot from your USB stick containing the Gentoo amd64 minimal install *.iso, with your target HDD installed in, or connected via USB, to your rig. No other drives should be connected to your system.
2. Choose Default at the initial Gentoo boot splash screen, then choose your keyboard layout, US (#41) is the default.
3. You are now root in tty1. Get the amd64 Handbook up and running in a second terminal, using links. Use ctrl-alt-f2 to open that second terminal.
3a. SharpEncryptedPig’s ProTip: Hover your mouse over the entire links http://www.gentoo.org/doc/en/handbook line which points to Gentoo, then right-click your mouse, and wah-lah, it’s ‘automagically’ copied. Now hit enter twice, and you’ll be taken to the main Gentoo page. We want amd64, so do: pgdn, and then down arrow two times, and you will be hovering over amd64. Hit enter, and ensure the amd64 Handbook is loaded.
3b. SharpEncryptedPig’s ProTip #2: If you need to conduct research at any time during this install, use ctrl-alt-f3, and do:
links www.startpage.com
4. Navigate to the amd64 Handbook, Chapter 4: Preparing the Disks. Read Sections 4a and 4b for an decent overview of disk partitioning. However, we are going to be doing things a bit differently. When you’re finishing reading, use ctrl-alt-f1 to return to tty1.
We WILL be using gdisk to structure our HDD. Do NOT use another partitioning tool, and do:
gdisk /dev/sda
Note: your target HDD, could possibly be recognized as /dev/sdb. Nada problema, mi amigos!! If that is the case, simply substitute /dev/sdb, as opposed to, /dev/sda, throughout the entire install process, including when we install rEFInd. When your installation is complete and we reboot in UEFI Mode, your target HDD WILL BE recognized as /dev/sda.
5. Verify the /dev/sdX (where X = a or b) identity of your target HDD, by entering:
p # which prints out the partitions contained on /dev/sda. If /dev/sda, is, in fact, your USB stick, enter:
q # which quits gdisk.
Now enter:
gdisk /dev/sdb
and, then enter:
p # to complete target HDD /dev/sdb verification. The remainder of this guide is predicated on your target HDD being recognized as /dev/sda. If your target HDD resides at /dev/sdb, re-read my Step 4 Note above. Proceed to Step 6, with your target HDD mounted in gdisk, and do the following:
6. ? # to view the available command list, then do:
7. o # to create a new empty GUID partition table (GPT), then do:
8. n # to add our first partition, then do:
9. ENTER # to accept the default starting sector, which is 2048, then do:
10. +500M # to create our 500 MiB /dev/sda1 partition, then do:
11. t # change our /dev/sda1 partition’s type code, then do:
12. L # to see all of the available filesystem types, hit ENTER to get to the end of the list, then do:
13. ef00 # to create our EFI filesystem. It is MANDATORY that EFI partitions are formatted with a FAT32 filesystem! No worries, gdisk has already taken care of this for you when you entered ef00. Now do:
14. c # to change our /dev/sda1 partition’s name, then do:
15. efi-boot # which is the name we want, then do:
16. n # to add our second partition, /dev/sda2, then do:
17. ENTER twice # the first ENTER accepts the default first possible staring sector for /dev/sda2, and the second ENTER finalizes /dev/sda2 on the very last writable sector of our HDD, which is EXACTLY what we want! Now do:
18. t # change our /dev/sda2 partition’s type code, then do:
19. L # to see all of the available filesystem types, then do:
20. 8e00 # to create our Linux LVM filesystem.
21. p # to verify that your HDD looks like this:
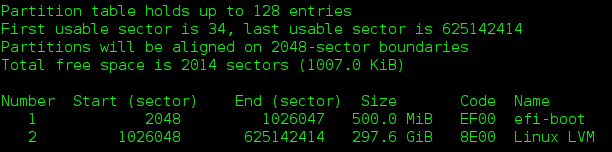
22. Finally, we MUST write all the above these changes to our HDD, so now do:
v # to have gdisk validate that their are no problems with our HDD, or our partitions.
23. Now do:
w # to WRITE our changes to our HDD! NOTE: If gdisk tells you to reboot so that the Gentoo installation kernel can read our new HDD partitions, immediately reboot your rig. Even if you are not told to reboot, I DO recommend that you reboot your rig at this point, then return here.
24. Now we get to the serious part of formatting, securely cleaning and encrypting /dev/sda2, so pay attention, and do the following:
cryptsetup -y -v –cipher=aes-xts-plain64 –hash=sha512 –key-size=512 –use-random luksFormat /dev/sda2
NOTE: I use this specific aes-xts-plain64 cipher, as do several serious coders involved with our i2p project, so that all you kids can sleep safe at night, secure in the knowledge that we take cipher security very seriously, and have selected this specific cipher as superior!
Enter your truly paranoid passphrase, twice.
# Note: Choose a passphrase which lives in harmony with your threat model, and I DO MEAN as if your life depends on it, because, in fact, YOUR LIFE WILL!!!
25. cryptsetup luksOpen /dev/sda2 yomomma # Note: ‘yomomma’ can be replaced by any word to which are you enamored. 😉
26. You can now see successful device mapping by doing:
# ls -l /dev/mapper/yomomma
27. Verify correct cipher structure with:
cryptsetup luksDump /dev/sda2
You should see these lines, among others, unique to your target HDD:
LUKS header information for /dev/sda2
Version: 1
Cipher name: aes
Cipher mode: xts-plain64
Hash spec: sha512
Payload offset: 4096
MK bits: 512
28. Now, to securely clean /dev/sda2, do:
dd if=/dev/zero of=/dev/mapper/yomomma
Note: Writing zeros to every sector of dev/sda2 can take many hours to complete. Do NOT skip this step, nor interrupt the process!
The writing process progress can be monitored with:
pv -tpreb /dev/zero | dd of=/dev/mapper/yomomma bs=128M
When the end of the device has been reached, the cleaning process is complete. Proceed to Step 29.
29. Now we create our volume group, and our two logical volumes, do:
pvcreate /dev/mapper/yomomma
vgcreate vg /dev/mapper/yomomma
lvcreate -L8G –name swap vg
Note: I like, and use, 8 GiB for my swap size here. You can specify any swap size you prefer, keeping in mind my prior future-proofing comments.
lvcreate -l 100%FREE –name root vg
This command creates our second logical volume, /dev/mapper/vg-root, which spans all non-swap space on /dev/sda2 from the first available sector to the very last writable sector on /dev/sda2!
30. To create filesystems on our two newly created, encrypted /dev/sda2 logical volumes, now do:
mkswap /dev/mapper/vg-swap
mkfs.ext4 /dev/mapper/vg-root
31. It’s time to get this pristinely cleaned, encrypted BadBoy mounted correctly so we can install our hardened stage3, so now do:
swapon /dev/mapper/vg-swap
mount /dev/mapper/vg-root /mnt/gentoo
mkdir /mnt/gentoo/boot
mount /dev/sda1 /mnt/gentoo/boot
cd /mnt/gentoo
32. Now follow the amd64 Handbook, Chapter 5, however, make absolutely certain, that you download and install a hardened stage 3. The hardened stage 3 you want to download NEEDS to come from, as one example, from one of my favorite institutions: Argonne National Laboratory (http)*. I have tested many Gentoo Mirrors and I can tell you that Argonne’s http and ftp Servers simply: ROCK!!
The correct hardened stage 3 URL from Argonne National Laboratory via ftp is:
ftp://mirror.mcs.anl.gov/pub/gentoo/releases/amd64/autobuilds/current-stage3-amd64-hardened/
To download a file, hover your mouse over the file you want, and hit ‘d‘ on your keyboard. The four files you need to download are:
stage3-amd64-hardened-‘release date’.tar.bz2
stage3-amd64-hardened-‘release date’.tar.bz2.CONTENTS
stage3-amd64-hardened-‘release date’.tar.bz2.DIGESTS
stage3-amd64-hardened-‘release date’.tar.bz2.DIGESTS.asc
Note: The hardened stage3 releases are also updated about every week. Always choose the most recent release from your selected mirror.
33. To verify the integrity of our downloaded hardened stage3, after substituting the correct date for your four downloads, do:
sha512sum -c stage3-amd64-hardened-‘release date’.tar.bz2.DIGESTS
and you should see that 2 of the 4 files checked are OK, including the sha512 verification of your stage3-amd64-hardened-‘release date’.tar.bz2.
34. To correctly install our Gentoo Hardened stage3, using the stage3 example above, do:
tar xvjpf stage3-amd64-hardened-‘release date’.tar.bz2
35. Continue following the amd64 Handbook at: 5.c. Configuring the Compile Options
Importantly, if you have a modern Intel CPU, such as a Core i5 or a Core i7 (both 3rd generation, or later), set CFLAGS in your /etc/portage/make.conf to:
CFLAGS=”-march=native -O2 -pipe”
and set your MAKEOPTS to:
MAKEOPTS=”-j3″
36. Follow all the instructions in Chapter 6 of the amd64 Handbook, and ensure your eselect profile is set to:
[11] hardened/linux/amd64 *
37. When you progress to 7.a. Installing the Sources, do NOT do: emerge gentoo-sources
Instead, do this:
emerge -av hardened-sources
Note: I NEVER emerge ANYTHING without using the ‘-av’ option. This is shorthand for the emerge –ask and –verbose options. I recommend you also adopt this habit as it will start making you keenly aware of the USE flags required by each package you emerge, as well as how much code you need to download, and then, build. The size of a download for a set of packages is strongly correlated to the total build and installation time required. Therefore, pay attention, and READ, AND ACT ON, ALL MESSAGES generated by Portage following EVERY EMERGE!!
Be sure to read the gradm message when your hardened-sources emerge has completed, and ENSURE you use the emerge command provided by Portage to install the latest gradm. This gradm installation MUST be completed PRIOR TO your initial Gentoo Hardened kernel boot!!!
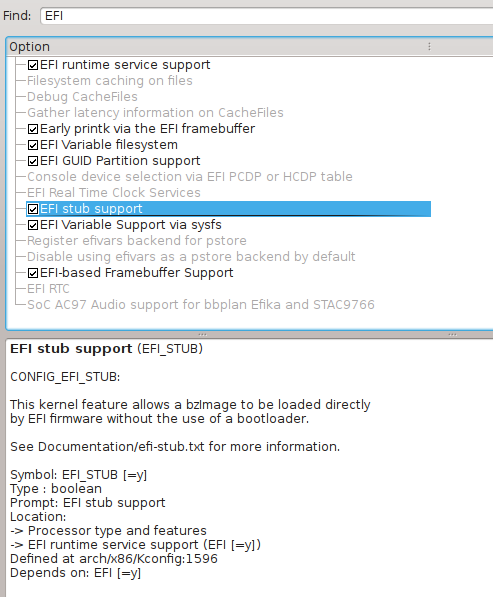
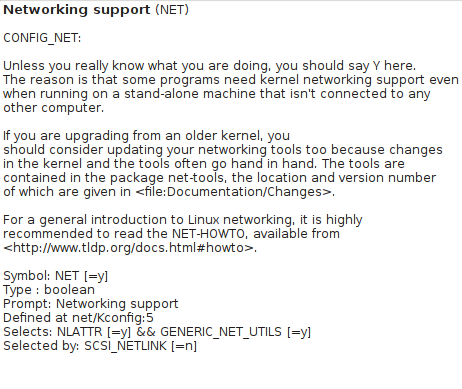
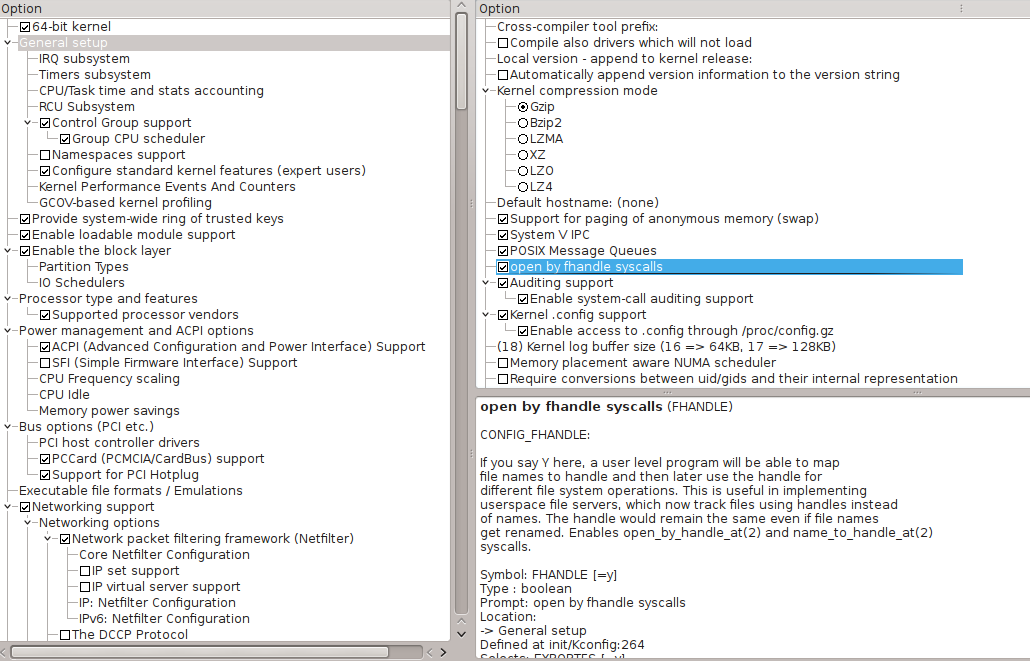
38. Now that you have arrived at: 7.b. Default: Manual Configuration, configure your kernel as is appropriate for your hardware, but note that the following kernel selections are MANDATORY, in addition to those specified in amd64 Handbook, if you expect your system to be able to boot!!
ENSURE you have ALL of the options listed here ENABLED, including ALL of the options checked in the images, below:
Kernel option:
General setup —>
[*] Initial RAM filesystem and RAM disk (initramfs/initrd) support
Kernel option:
Device Drivers —>
Generic Driver Options —>
[*] Maintain a devtmpfs filesystem to mount at /dev
Kernel option:
Device Drivers —>
[*] Multiple devices driver support —>
Device Mapper Support
Crypt target support
Kernel option:
Cryptographic API —>
XTS support
-*-AES cipher algorithms
Also ensure you install the correct drivers for your ethernet hardware and your wireless hardware as MODULES!!!
39. When you arrive at Code Listing 2.9: Installing the kernel, do:
cp arch/x86_64/boot/bzImage /boot/kernel-3.13.6-hardened-r3
# Adjust, as necessary, for future kernel releases! Now, our kernel has been safely copied to our /boot directory on /dev/sda2.
SharpEncryptedPig’s ProTip: Since you have a considerable time investment in your configured hardened kernel, you should know that all of your selected kernel options are stored in: /usr/src/linux/.config. I recommend you copy .config to /boot on both /dev/sda2 and /dev/sda1. In fact, I always keep my 3-4 most recent .config files stored on both /boot directories, in case I need, or want, to revert to a previous kernel configuration.
40. For our purposes, building an initramfs is not ‘Optional,’ it is, in fact, Mandatory!
However, we need to emerge several VITAL packages before we emerge genkernel and build our initramfs, therefore do:
emerge -av sys-fs/cryptsetup
NOTE: cryptsetup will also pull in lvm2, which we also absolutely NEED!
NOTE: As each emerge completes, read Portage’s output carefully. Do everything Portage recommends!!!
ENSURE you have issued both of these vitally important commands:
rc-update add dmcrypt boot
rc-update add lvm boot
I use ufed to manage my USE flags, and I can highly recommend this code for your daily use. Therefore, now do:
emerge -av ufed
In your terminal, do:
ufed
Now in your ufed GUI type: crypt and set the ‘+’ USE flag with your spacebar, if it is not already enabled. You should also see that cracklib is already enabled.
Then, do the same for cryptsetup and also for lvm.
Hit ENTER twice to save your settings, and exit ufed.
You will need gentoolkit to add support for the revdep-rebuild command, which is critical for keeping Portage, and your system, properly updated, as well as adding support for other useful system functions. Therefore, now emerge gentoolkit by doing:
emerge -av gentoolkit
I recommend you also emerge links so you can access the Net, post-install, but still pre-emergent of your Desktop Environment, which requires several Gigabytes of downloads, and many hours of installation time. Therefore, do:
emerge -av links
41. Now, double check that both cryptsetup and lvm are contained in the USE= section of your /etc/portage/make.conf. Now, perhaps, you are beginning to realize the utter ‘USEfulness’ of ufed. Just do NOT forget that is was THIS BOY who ‘merely suggested’ YOU emerge ufed! 😉
nano -w /etc/portage/make.conf
Note that crypt won’t appear in /etc/portage/make.conf because it is an Obsolete USE flag for LUKS support. That is why we set the cryptsetup USE flag. However, if you read the USE flag descriptions for crypt, you will see that it is useful for many cryptographic tasks. Crypt is also critical for emerging genkernel correctly, which is why crypt needs to be set.
42. Now we are ready to emerge genkernel with the proper USE flags set and then generate our initramfs, so now do:
emerge -av genkernel
and you should see:
[ebuild R ] sys-kernel/genkernel-3.4.45.1 USE=”crypt cryptsetup (-ibm) (-selinux)” 0 kB
Obviously, the version number will change over time.
Your ebuild field will, of course, contain a N for New Install, not the R (Reinstall) shown in the example from my existing Gentoo Hardened installation above. The genkernel USE flags I’ve shown above are vital to your booting success, so ensure they are set.
and then enter:
y # to emerge genkernel
A ‘word’ of a caution first. NEVER append the word ‘all’ to the end of any genkernel command! If you were to include the word ‘all’, you would install genkernel! We do NOT want to install genkernel! We DO want to install initramfs with MANDATORY support for LUKS and lvm, as shown in the following command.
If you also want RAID support, like me, append the –mdadm option as shown below.
43. To build our initramfs, do:
genkernel –lvm –luks –mdadm –install initramfs
Memorize that command because you will be using it every single time you reconfigure, and recompile, your kernel for the rest of your Gentoo Hardened life!!
You should see:
genkernel –lvm –luks –mdadm –install initramfs
* Gentoo Linux Genkernel; Version 3.4.45.1
* Running with options: –lvm –luks –mdadm –install initramfs
* Using genkernel.conf from /etc/genkernel.conf
* Sourcing arch-specific config.sh from /usr/share/genkernel/arch/x86_64/config.sh ..
* Sourcing arch-specific modules_load from /usr/share/genkernel/arch/x86_64/modules_load ..
* Linux Kernel 3.11.7-hardened-r1 for x86_64…
* .. with config file /usr/share/genkernel/arch/x86_64/kernel-config
* busybox: >> Using cache
* initramfs: >> Initializing…
* >> Appending base_layout cpio data…
* >> Appending auxilary cpio data…
* >> Copying keymaps
* >> Appending busybox cpio data…
* >> Appending lvm cpio data…
* LVM: Adding support (compiling binaries)…
* lvm: >> Using cache
* >> Appending mdadm cpio data…
* MDADM: Skipping inclusion of mdadm.conf
* MDADM: Adding support (compiling binaries)…
* MDADM: Usingoot cache
* >> Appending luks cpio data…
* Including LUKS support
* >> Appending modules cpio data…
* >> Appending blkid cpio data…
* >> Appending modprobed cpio data…
* >> Compressing cpio data (.gz)…
* WARNING… WARNING… WARNING…
* Additional kernel cmdline arguments that *may* be required to boot properly…
* add “dolvm” for lvm support
* add “domdadm” for RAID support
* With support for several ext* filesystems available, it may be needed to
* add “rootfstype=ext3” or “rootfstype=ext4” to the list of boot parameters.
* Do NOT report kernel bugs as genkernel bugs unless your bug
* is about the default genkernel configuration…
* * Make sure you have the latest ~arch genkernel before reporting bugs.
That WARNING is indeed vital, and we will be addressing those issues, among others, in subsequent steps.
Heads Up: Now our initramfs is safely stored along with our configured, hardened kernel in our /boot directory on /dev/sda2! However, as you know, our /dev/sda2 is fully encrypted, which means that NONE of the files contained within /dev/sda2 can be read at initial boot, prior to /dev/sda2 mounting! Therefore, we will be copying these two critically important boot files to our unencrypted /dev/sda1 in a few more steps!
44. Continue reading the amd64 Handbook starting from section 7.d. Kernel Modules and follow ALL instructions through the end of Chapter 9.
However, when you reach Chapter 8, configuring your /etc/fstab, ENSURE your /etc/fstab EXACTLY matches mine, of course, substituting your correct /dev/sda1 UUID where I’ve showed you to replace my text with your actual 8 character UUID string:

Properly Unmounting Your Gentoo Hardened Installation and Rebooting into UEFI Boot Mode
45. CAREFULLY read all of the information contained in this Step 45 BEFORE you execute any of the commands in Step 46.
After you have reached the end of Chapter 9 of the amd64 Handbook, we are now ready to boot into UEFI mode using the SystemRescueCD. It is important to note that while you were using the Gentoo minimal install.iso you were NOT booted in UEFI mode, even if you were using an UEFI capable computer.
In fact, my Asus rig will not even recognize the Gentoo minimal install.iso unless I intentionally DISABLE UEFI Booting, and ENABLE Legacy (BIOS) Boot mode.
It is IMPERATIVE that we boot in UEFI Mode to properly install and configure rEFInd, and then finally to boot in UEFI Mode so that we can properly launch Gentoo Hardened using rEFInd!!
Therefore, after you reboot as I discuss immediately below, ensure you first remove the Gentoo minimal install.iso, and then boot launching your BIOS settings {f2 on an Asus rig}, and DISABLE any ability to boot in BIOS (Legacy) Mode. ENABLE your rig’s UEFI Boot Mode. Furthermore, DISABLE Secure Boot Mode. You can enable Secure Boot Mode later if you want to by following Rod’s Secure Boot instructions, but we don’t need additional potential headaches now. Then save your BIOS Settings, and reboot in UEFI Mode with the SystemRescueCD USB stick connected to your computer.
46. To properly unmount, and then reboot, our Gentoo Hardened installation do the following:
exit
cd
umount -l /mnt/gentoo/dev{/shm,/pts,}
umount -l /mnt/gentoo{/boot,/proc,}
reboot
Completing Your Gentoo Hardened Installation
47. On the SystemRescueCD splash screen menu, choose to boot into the 64-Bit graphical environment.
48. Now that we have booted into UEFI mode, we need to open our encrypted /dev/sda2, get everything properly mounted, and then chroot into Gentoo Hardened. Therefore, execute each of these commands, in this precise sequence:
gdisk /dev/sda
Use gdisk’s p command to verify that your target HDD is actually /dev/sda. It is possible that your target is actually /dev/sdb. I am, again, assuming your Gentoo Hardened target HDD is /dev/sda. Enter q to exit gdisk.
Continuing, now do:
cryptsetup luksOpen /dev/sda2 yomomma
vgchange -ay
swapon /dev/mapper/vg-swap
mount /dev/mapper/vg-root /mnt/gentoo
mount /dev/sda1 /mnt/gentoo/boot
cd /mnt/gentoo
mount -t proc proc /mnt/gentoo/proc
mount –rbind /sys /mnt/gentoo/sys
mount –rbind /dev /mnt/gentoo/dev
chroot /mnt/gentoo /bin/bash
source /etc/profile
export PS1=”(chroot) $PS1″
49. Now that we are chrooted, let’s grab some simply awesome boot management software. Now do:
emerge -av efibootmgr
50. Verify that /dev/sda1 is mounted at /boot by doing:
df -h
If it is not, do:
mount /dev/sda1 /boot
then do:
cd /boot
then do:
ls -al # to verify you are in your /dev/sda1 /boot directory and not the SystemRescueCD’s /boot directory.
At this point of the installation process, there are 3 separate /boot directories, so let’s make sure you keep them sorted correctly in your mind.
The first /boot directory is located on /dev/sda2, and that is where our hardened kernel and initramfs are currently stored. We need to copy those two files to correct, second, /boot path on /dev/sda1 so that we can boot.
The third instance of /boot is the /boot directory on the SystemRescueCD, the contents of which we do NOT want to touch, or change! BE CAREFUL, and ensure you know where you are! You can always use ‘pwd’ to verify your current directory location.
Let’s now create the /boot path directories we need on /dev/sda1.
51. Create each of the following directories.
mkdir boot/efi
mkdir boot/efi/EFI
mkdir boot/efi/EFI/refind
mkdir boot/efi/EFI/linux
52. Now cd to /boot on /dev/sda2 and COPY your hardened kernel AND your initramfs to:
/boot/efi/EFI/linux
53. Now do:
cd /boot/efi
ensuring that /dev/sda1 is mounted at /boot/efi
54. Surf to Rod Smith’s rEFInd website at: www.rodsbooks.com
Download, decompress, and install rEFInd as instructed.
55. Now do:
cd /boot/efi/EFI/refind
56. Then do:
nano -w refind.conf
and add the following boot stanza:
menuentry Gentoo {
volume efi-boot
icon EFI/refind/icons/os_gentoo.icns
loader EFI/linux/kernel-3.13.6-hardened-r3 # Substitututing, the correct kernel version, here, and on the next line!
initrd EFI/linux/initramfs-genkernel-x86_64-3.13.6-hardened-r3
options “crypt_root=UUID=ENTER YOUR ACTUAL CRYPTROOT UUID HERE dolvm domdadm root=/dev/mapper/vg-root rootfstype=ext4 resume=/dev/mapper/vg-swap”
}
Make certain, you have substituted, the correct kernel version, on the loader and initrd lines above!
As previously stated: the ‘domdadm’ command above is optional, and should be used only if you want RAID support.
If you don’t know how to obtain your UUID, do:
ls -l /dev/disk/by-uuid
57. Now do:
nano -w /boot/efi/EFI/linux/refind_linux.conf
and add the following statements:
“Boot with standard options” “crypt_root=UUID=ENTER YOUR ACTUAL CRYPTROOT UUID HERE dolvm domdadm root=/dev/mapper/vg-root rootfstype=ext4 resume=/dev/mapper/vg-swap”
“Boot to single-user mode” “crypt_root=UUID=ENTER YOUR ACTUAL CRYPTROOT UUID HERE dolvm domdadm root=/dev/mapper/vg-root rootfstype=ext4 resume=/dev/mapper/vg-swap single”
#”Boot with minimal options” “ro root=UUID”
58. Now do the following:
man efibootmgr # READ THIS MANUAL!
then do:
efibootmgr -v
then delete any existing items from the BootOrder which are not related to SystemRescueCD.
then do:
cd /boot/efi/EFI/refind
then do:
efibootmgr -c -l \\EFI\\refind\\refind_x64.efi -L rEFInd
If your target HDD is currently /dev/sdb, you MUST do this:
efibootmgr –disk /dev/sdb -c -l \\EFI\\refind\\refind_x64.efi -L rEFInd
Verify that rEFInd is now Boot 0000, by doing:
efibootmgr -v
A correctly configured rEFInd WILL generate EFI boot code similar to this:
efibootmgr -v
BootCurrent: 0000
Timeout: 1 seconds
BootOrder: 0000,0001
Boot0000* rEFInd HD(1,800,96000,YOUR GENTOO HARDENED TARGET HDD /dev/sdX1 PARTUUID)File(\EFI\refind\refind_x64.efi)
Boot0001* UEFI: YOUR HDD MFR YOUR HDD MODEL# ACPI(6 APHLANUMERIC DIGITS0,0)PCI(1d,0)USB(1,0)USB
(3,0)HD(1,800,96000,YOUR HDD PARTUUID)AMBO
If efibootmgr shows you similar boot code, YOU SHOULD BE GOLDEN to boot into your encrypted Gentoo Hardened installation with rEFInd!!!
59. As before, to properly unmount our Gentoo Hardened installation do the following:
exit
cd
umount -l /mnt/gentoo/dev{/shm,/pts,}
umount -l /mnt/gentoo{/boot,/proc,}
Use the Logout option from SystemRescueCD, then select Restart.
Remove your USB stick and use your UEFI boot mode to launch rEFInd which will then find, and fire up, Gentoo Hardened!!
Thank God Almighty and The Good Lord Buddha, I AM FREE, AT LAST!!!

CONGRATULATIONS, AND WELCOME TO YOUR NEW ENCRYPTED GENTOO HARDENED OPERATING SYSTEM!!!

Post Installation Work and Package Recommendations
60. Return to the amd64 handbook, Chapter 11. Finalizing your Gentoo Installation and set up your user account(s).
NOTE: All of following software recommendations, are OPTIONAL!
If you know what you like: CONGRATULATIONS: You, are: DONE!! Enjoy ROCKING Your Gentoo Hardened! 🙂
61. I run more than 10 different Linux Operating Systems, as well as every release of Windows from XP to 8.1. I run each of these operating systems behind my Whonix Gateway using Virtual Box. My point being, I have seen, tested and extensively used, the Desktop Environments offered by every major Linux distribution, and all of the desktops offered by Microsoft since the first, then truly revolutionary, graphical version of Windows, Win 3.11, was initially released by Microsoft, some 30 years ago.
Based on my deep experience(s), I strongly prefer the power, functionality, management flexibility and the beauty offered by the KDE Desktop Environment, but the DE choice is solely YOURS to make. If you opt for the KDE desktop, follow the excellent Gentoo KDE wiki.
The generic KDE installation process progresses, as follows: make certain you have satisfied, and correctly configured, every one of the Prerequisite Services, then emerge the full XOrg server, as instructed, and finally emerge the ‘real KDE deal’ which is: kde-base/kde-meta.
SharpEncryptedPig’s ProTip: A fully enabled KDE Desktop requires emerging and building nearly 2 Gb of code. During the installation you’ve just completed, you downloaded and built only a few hundred Megabytes of code. To minimize KDE installation pain, it is worth your time to carefully speed test your three selected mirror servers by downloading stage3-hardened.isos from each of the servers you chose in /etc/portage/make.conf. Now, ensure the fastest of your three servers is the first (i.e. left-most) server listed in /etc/portage/make.conf. This speed test and editing step is crucial, and it is important to note that the remaining two servers listed in your make.conf are basically there ONLY as fail-over servers, and will rarely, if ever, be accessed when you emerge any package!!
Fair Warning: If you want full-on KDE, which I highly recommend, you’ve got many hours of emerging ahead of you. Also note you will NOT have Mouse or Touchpad support until your Desktop is fully built!!! You will, at a minimum, need to manually edit your /etc/portage/package.use and your /etc/portage/package.accept_keywords files during this lengthy emerge process. Therefore, you WILL need to keep a pen and paper handy so you can record the portage required changes prior to editing these files. However, realize this somewhat tedious process is a one-time investment, and you’ll be very pleased with the outcome!
62. If you require secure wireless access, follow the well written Gentoo wpa_supplicant wiki guide.
63. Important HINT: I use the superb: net-firewall/arno-iptables-firewall package to completely LOCK OUT ALL potential intruders from my otherwise massively connected rig. I highly recommend you do the same!
64. Install java or IcedTea, then grab a fresh copy of i2p from http://geti2p.net, and install it. Start i2p, and let i2p create /home/USER/.i2p. Then shutdown i2p. Now, deleterc all the contents /home/USER/.i2p, and then, copy ALL the contents of .i2p from your former OS into /home/USER/.i2p. Start i2p, and then emerge the IRC client of your choosing and point it at 127.0.0.1:6668!
My i2p Settings Optimization Guide is always available for you, on THIS site.
65. We are ALMOST done here, but for your surfing safety and privacy, I recommend you emerge Tor.
Following installation, start Tor by doing:
/etc/init.d/tor start
Run Tor, permanently, as a daemon by adding Tor to your /etc/runlevels/default services by issuing this command:
rc-update add tor default
When using Gentoo Hardened, with Konqueror, as I’ve used in the example below, or in ANY other browser, edit your proxy settings so they match mine:
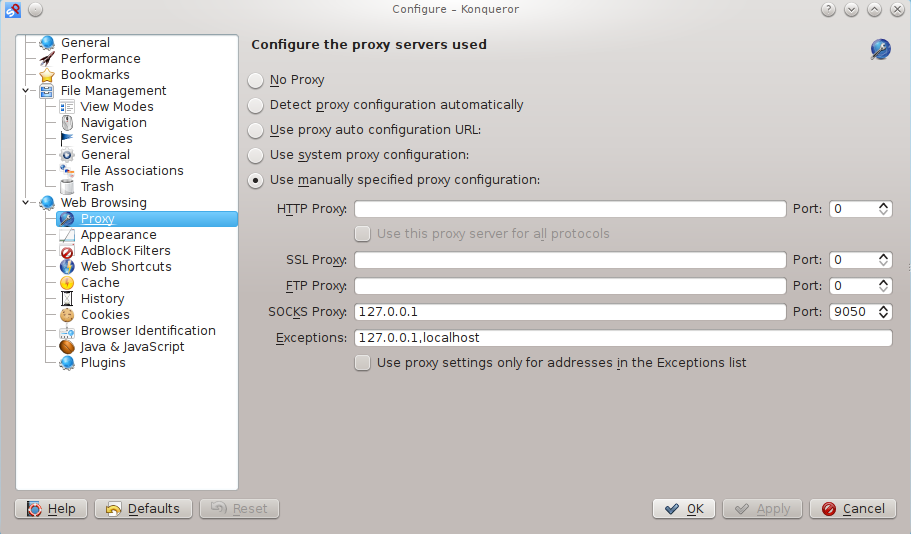
Click ‘Apply’ (or similar) to save your new settings, then close, and re-launch Konqueror.
Finally, verify your Tor daemon is working correctly by by surfing to: http://ipaddress.com
66. I consider email, and sensitive file, encryption, to be MANDATORY. If you agree with my way of thinking, be sure to emerge both: app-crypt/gnupg and kde-base/kgpg.
67. SharpEncryptedPig’s FINAL ProTip: i.e. repeat, in unison, aloud: Thank You, My God, and THANK YOU, MY BUDDHA!!! Never forget that YOU control, and are, therefore, completely responsible for, YOUR entire Gentoo Hardened USER Experience, and NOT the other way around!
To wit, you always have these options available which allow you to control, as ROOT, ANY Gentoo Hardened service, using Tor, below, merely as an example:
/etc/init.d/tor status
/etc/init.d/tor start
/etc/init.d/tor stop
/etc/init.d/tor restart
Now, friends, I sincerely hope YOU ENJOY YOUR Gentoo Hardened FREEDOM!!
I offer the following statement to ANYONE who may ‘claim’ this Gentoo Hardened installation process does NOT work!!!
This Gentoo Hardened installation process IS KNOWN TO WORK, when followed, with precision!
The reason I KNOW MY SOLUTION WORKS is quite simplistic: I composed this entire guide from my encrypted, x86_64, Gentoo Hardened, KDE Desktop enabled rig, over the course of several days, from the welcome comfort of my bed!! I was able to compose this guide from my bed, because my Gentoo Hardened installation also INCLUDES properly functioning, secure, Wireless Access to the Net!!
When this install succeeds for you, if you have the ability to spare some BTC as fair compensation for identifying and developing this comprehensive solution, and for this non-trivial documentation effort, please contact me by any of the methods I have outlined on my Who I Am post on THIS site! :-).

Pictured above, is undoubtedly, an intrepid Gentoo lady saying to a Gentoo Hardened gentleman: Come ON Man…JUMP IN: the Water IS FINE!!